
The Best Painting Support, Ever!
Untempered Hardboard
I often talk about painting supports and how important they are for the stability and permanence of the painting, sort of like the foundation of a house. A high quality surface does not have to be expensive, in fact, it is easy to make your own excellent painting panels yourself.
Whether you paint in oils or acrylics or mixed media, these hardboard panels will be the best, most permanent, surface for your work. Particularly for oil paints that prefer a stable, rigid surface rather than a flexible fabric like cotton. We are very fortunate to have this product available to us today. The Old Masters went to great lengths, and expense, to procure wooden panels for their oil paintings. They would have loved hardboard.
Hardboard is simply wood fibers compressed under extreme pressure. The natural glue in the wood (lignin) is what binds it together. This ensures that the panel is stable, without knots or the wood grain resin canals that naturally appear in wood products - these are the places where the wood glue is concentrated and so will be the area that will dry out and crack. Other manufactured wood products like MDF or Plywood Birch Panels, which are a favorite with many painters, are not as stable or permanent because of the glues and resins used to hold them together.
The cost of these homemade panels is very inexpensive compared to pre-made commercial canvas or painting panels sold in art supply stores. Get together with some painter friends and have a ‘panel party’ where you can make enough panels to last a couple of years all in one day.
Here's how to do it:
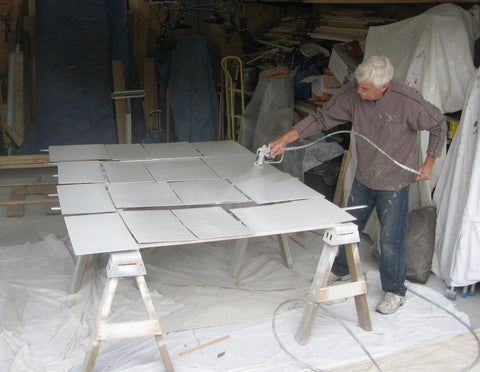
Supplies you will need:
Untempered hardboard (Masonite) cut to size, White Shellac, Methyl Hydrate, (buy these items at the hardware store) a wide brush, sponge roller (optional), no. 60 or 80 sandpaper, Gesso.
- Buy Untempered Hardboard. You can get smooth on one side or smooth on both sides. Hardboard comes in two thicknesses, 1/8” and 1/4". For paintings up to about 16x20 I sometimes use the thinner 1/8”, and for sizes up to 20x30 I use 1/4". It comes in 4x8’ sheets and most hardware stores will cut it into whatever sizes you like for a fee.
Note: For sizes larger than 20x30" I will attach wooden bracing (cradling) to the back for stability.

- Sand the smooth surface before sizing. No.60 or 80 sandpaper is good.
- Size both sides of the panel with a mixture of 3 parts Methyl Hydrate to 1 part White Shellac. Apply the shellac in a thin layer in one stroke of the brush or roller. If you apply too much size the surface will become too shinny and smooth and the gesso will not adhere well to it, then you will have to sand it again. You can substitute the Shellac for Golden’s GAC 100 medium, diluted 2 parts GAC 100 to 1 part water. If you use the GAC 100 you will want to sand the surface once it is dry as the water in the medium will make the wood grain rough.
- Apply a coat of Acrylic Polymer Gesso on the back of the panel and at least two coats on the front. If you want a very smooth finish you can sand with fine sand paper between each coat after it has dried. You can use an inexpensive gesso on the back since its only purpose there is to keep the panel from warping, and a premium quality gesso on the front. You will find the best gesso will have more covering power and better adhesive strength.
Note: If you prefer to spend more time painting, like me, you can have your cradled panels made for you @ Mouldings & More in Kelowna. Tell them you want them made to David's specs.